OUTLINE:
Whitepaper:
Hyperledger Service Level Agreements
Purpose of This Paper
The purpose of this paper is to describe and build a Service Level Agreement (SLA) prototype on Hyperledger Fabric using Composer while using existing software components as much as possible.
Our participants will leverage knowledge gathered during earlier collaborative projects to be able to deliver effectively and to not reinvent the wheel.
Intended Audience
Our intended audience are CIO's, CDO's, CTO's and Developers working in organizations whose performance is dependent on meeting Service Level Agreements both internally and externally. Our proposed solution will adhere to the Service Provider - Vendor model but can also be aligned to other technical service management models like those described in the ITIL methodology.
Introduction
This white paper explains... [start with a brief topic sentence that sums up what’s in the document. This section “tells them what you’re going to tell them.”]
[In this section, provide a high-level introduction to the topic being covered. If the main body of the white paper will cover four different topics, name them each here, and point to the section where they are considered in more detail.]
[This section doesn’t have to be written first, but it must be filled in before the publication is complete. This helps readers understand the scope of the white paper and whether it’s worth their time to read the entire publication.]
1.1 subsection--topic 1
[If needed, break up the Introduction in subsections. Always have at least 2 subsections, 1.1 and 1.2 or else this numbering system looks unnecessary.]
1.2 subsection--topic 2
[same as above]
1.3 subsection--topic 3
[same as above, if needed]
[Add a page break at the end of the Introduction]
2. SLA Back & Front-End
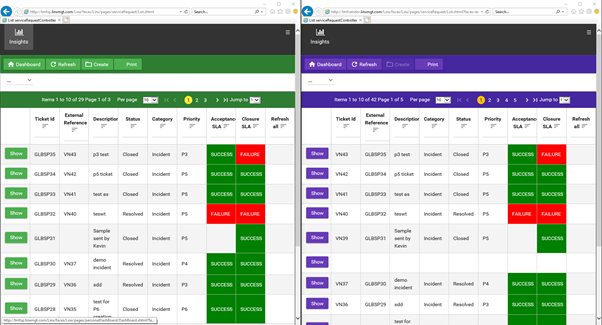
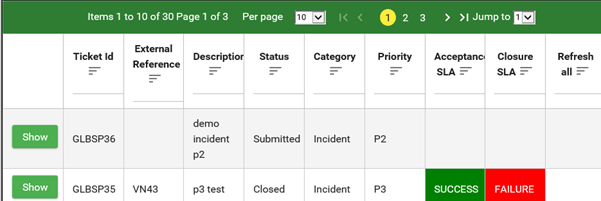
This section describes an earlier application interface for the SLA solution including prints of the service provider -and vendor screens.
Back-end on Bluemix (Demo Transaction) :

Front-end interface:
Green = Service Provider screen
Purple = Vendor screen
Item 1
Item 2
Item 3
2.1 Ticket creation - service provider
From the provider screen, click 'Create'

2.2 Enter details and save
Enter the ticket details and click 'Save'

2.3 View created ticket
The ticket is created and the details are displayed. Note that the SLA details have been calculated by the blockchain.

2.4 Go back to List view
Vendor view
The Vendor views are displayed below
4.1 Refresh list to see new ticket

4.2 View the ticket
The details have been read from the blockchain

4.3 Accepting vendor ticket
Update the ticket by changing the status to Acknowledged, entering a comment and saving the ticket

Tickets appearing in service provider view
The following screens show the consequent service provider view
5.1 Notification on the service provider ticket
A notification appears indicating that the ticket has been updated

5.3 view the updated service provider ticket
Click on 'show' to see the update and the ticket has been set to acknowledged, and the Acceptance SLA has been calculated - in this case it has failed.

5.4 Vendor Updates
Going back to the Vendor view, we can resolve the ticket and set a comment and save

Note that the closure SLA is also being calculated

5.5 Service Provider move back in progress
On the service provider side you can close the ticket or put it back in progress

If you put it back in progress, the closure SLA status is cleared. You can then resolve the ticket in the vendor system.
Conclusions
This white paper explained... [sum up the white paper briefly. This section “tells them what you told them.” Although this may seem repetitive, some people flip to the back of a document to see “the bottom line” and what they might have missed.]
Further Resources
[In this section, list any further resources or interesting reading that might illuminate the topic more. Include enough detail so that a reader could easily locate that source, including URLs if appropriate.]
Notes
[Although GDocs can’t do Endnotes, the designer will move all your footnotes here. In every footnote, provide the AUTHOR(s), the article or document TITLE, the PUBLISHER, the DATE, and if you have it, the PAGE NUMBER. For a website, include the URL and RETRIEVED ON DATE.]
POINTS TO COVER
- Motivation / Problem
- Barriers
- Customer Groups
- Opportunities
Solution:
Platform
Team
Road map- Mission
- Use Cases
- Conclusion
This work is licensed under a Creative Commons Attribution 4.0 International License
creativecommons.org/licenses/by/4.0
Acknowledgements
[list all the contributors to the white paper in alphabetical order by LAST name. Many working groups keep a list of members or contributors on their wiki pages or their minutes. Don’t include anyone’s name without their okay.]
Whitepaper Standards Contributed by Learning Materials Development Working Group, Gordon Graham and Bobbi Muscara